An electrical switch is a device that starts and stops electric current by opening and closing the electrical circuit. In the simplest description, a switch has two conductive pieces, usually metal, called contacts, connected to an external circuit, that touch to complete (make) the contact, and separate to open (break) the circuit.
This article will show you how to make your own easy, inexpensive switch using textile components, which will create a connection that you can engage and will stay engaged until you disengage it. This will be similar to a light switch that you turn on, and it will stay on until you turn it off.
Materials you will need
- An LED light
- An assortment of fabric snaps
- Coin sized cell battery – 20mm (CR2032). This Lithium metal 3V 250mAh, great for powering low processors or blink an LED.
- Set of sewing needles
- Conductive Thread Bobbin – 30ft (Stainless Steel)
- Coin Cell Battery Holder – Switched – 20mm
You will also need to have a piece of felt, scissors, fabric, an embroidery hoop and maybe a needle threader (if needed).
Steps to creating your switch
Start by cutting a small strip off of your felt, about half an inch and 2-3 inches long.
- Position your battery holder on your main piece of fabric.
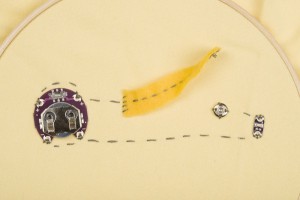
- Stitch the two positive pins of the battery holder to the fabric and then make a stitch connecting the two pins with conductive thread.
- Continue the stitch for another inch or so in the direction you want you LED to be attached.
- Continuing with the last stitch, attach one end of your felt strip with the other end pointed in the direction of the LED.
- Continue the stitch in a line along the whole length of felt, but don’t attach it to the fabric.
- At the loose end of felt, using the same stitch, sew the “male” side (the side with the nipple) of the snap to the bottom of the felt strip. The nipple should point down toward the fabric. There are small holes around the edge of the snap to allow it to be sewn to the felt. When this is done and the snap is firmly attached, knot and cut the thread.
- Directly below the male end of the snap, attach the female end securely to the fabric. This should allow the two snaps to mate when the felt strip is at full extension.
- Using the same piece of thread, make a stitch on the fabric from the female end of the snap to where you want the positive pin of the LED to be and sew the LED down. Knot and cut your thread.
- With a new piece of thread, sew down the negative pin of the LED.
- Sew a line from the negative pin of the LED to the negative pins of the battery pack and sew both of them down as you did with the positive pins. Knot and cut the thread.
Thats all there is to it! Slide your battery into the battery holder with the positive side up and turn the battery pack switch on. When you snap the felt to the fabric, the light will turn on, when you unsnap it the light will turn off.
Please take a look at all of other interesting and fun experiments.
Related articles:
The Difference Between Electric Charge and Electric Current
The basics of “DC” electricity
Scientists Develop Cross-Linked Electrolytes To Make Lithium-Ion Batteries Safer


