Making a greeting card is simple. But making a card that lights up or makes a sound when you open it is something else. This had been done for the longest time but have you ever wondered how it is done? The secret lies in what is known as a paper circuit.
What you will need:
For the paper circuit there are only three essential materials.
- Copper tape
- Surface-mount LED
- 3V 12mm Coin Cell Battery
Other materials that you may need (depending on the design of your paper circuit) are the following: soldering iron, safety glasses, tweezers, clips, clear tape, scissors, pencils and pens to trace the pattern
For the greeting card
- Paper cardboard (in different colors)
- Thicker paper cardboard (same color as your base card)
- Scissors or hobby knife
- Gluestick/Glue
What you need to do:
Greeting card pattern
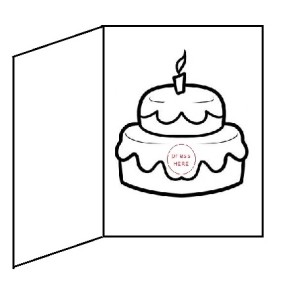
- Choose a pattern for the greeting card. Ideally, you want to choose a pattern that has two layers so the paper circuit you will make can be hidden in between the layers. A simple card will do like the cake design that we have below. When the recipient of the card presses the “press Here” circle, the flame of the cake should light up.
- Take a colored paper cardboard that will be your base. Fold it in the middle. This will be the base of your card.
- Print your design (in our example the cake) on another paper cardboard. You can opt to use different colors for the cake’s icing to make the card more festive. Cut out different colors for each portion of the cake pattern.
- Cut out a hole on the flame – this is where the LED will be seen when it lights up.
- Set it aside for assembly later on.
Paper circuit
- Print another copy of the design so you can trace the paper circuit on it accurately. You want to make sure that the battery and the “press here” on the cake design will be on the same spot. The same is true for the LED and the flame of the design.
- Cut the cake design and glue it on the card.
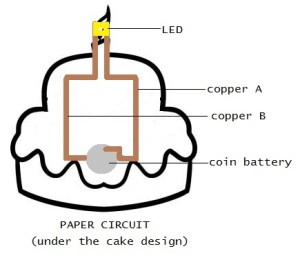
- Layout the copper tape as shown in the paper circuit pattern below. Peel off the copper tape backing to reveal the adhesive side. This will help the copper tape stick to the paper cardboard. This layout will depend on your chosen design.
- Position the copper B tape first. Place the coin battery on top of it. Make sure that the the side with the positive sign is facing up.
- Position the copper A tape next. You need to start from the flame. Measure the surface mount LED to know how far copper A should be from copper B. The LED should be able to lie on top of both copper tapes.
- When you get to the end of the copper A tape that is near the battery, fold the end of the tape back on itself so the sticky side will be against each other. That way, when the copper A tape is pressed onto the battery, the copper side will touch it – not the side with the adhesive. Bend the tape so it is on top of the battery, but not touching it. You want it to touch the battery only when the recipient presses the “Press HERE” button.
- Place the surface mount LED. You can use tweezers to help mount it. Check if you placed it correctly by touching the copper A tape to the battery. If the LED does not light up, flip the battery over. When it lights up, secure the LED with clear tape. You can also use a soldering iron to put them together.
Assemble the card
- Take the cake design (the colorful one) and place it on top of the paper circuit.
- Since the battery will be a bit bulky, you may want to elevate the”Press HERE” button. You can do this by placing some folded paper around the battery so the cake design on top of it will be elevated. You can choose to elevate the whole cake design if you wish. That is up to you. Just make sure that when the recipient presses the button, it will be shallow enough to allow the copper tape to touch the battery and thus make the flame light up.
What just happened:
We positioned the paper circuit in such a way that it will compliment the design of the greeting card. Since the copper A is not touching the battery, we have an open circuit. The only time it will be complete is when the one handling the card presses the button to connect the copper to the battery.
This is a basic way of creating a greeting card that lights up. You can experiment on different circuits and patterns too.
Related Articles:
How to Make a Moonlit LED Flower


